Application Help
-
Download and Install
-
Login
-
Registering
-
Search for friends
-
Making a video call
-
Dropping the call
-
Group video conferences "2x120"
-
Starting text chatting
-
Address Book
-
Call History
-
Record and playback video
-
Microphone and sound troubleshooting
Thank you for choosing our video messenger. This manual will take you through the simple process of preparing you to start video communication using Conferendo.
Download and Install
Loading of messenger's setup file
If you still don't have the client, go to the Conferendo main page. Click "Free Download" to get the latest version of the video messenger.
You also can download messenger's setup file on the page "Download".
Installation
When you have downloaded the file, run it and follow the simple instructions. The whole procedure takes only a minute.

Log in
After you have finished the process of initial configuration, the login dialog window will open automatically. If you want to open the login dialog at a different time, just select My Conferendo -> Login on the application menu bar (Main menu) or click on any available button on the application toolbar (Tool bar) while not logged in to the application.
If you have already registered as a Conferendo user, input your ID and the password into the corresponding fields, click OK - the system will log you in.

Registering
If you do not have your login information yet, click on the Get your Conferendo ID button and fill out the registration form.
Note: Without registering, you won't be able to use Conferendo service.

Search for friends
To find a person to talk to, go My Conferendo -> Open Community… on the Main menu or click button
 on the toolbar situated on the right side of your text messenger's window. It will take you to the Meet New Friends (Search) webpage, where you can look for someone to chat with. From there you can run a detailed search through Conferendo's database of users.
Note: Please keep in mind that in order to use our advanced site search, you must be logged in at the Conferendo portal. You will also need to be logged in in order to contact your selected chat partner directly at his/her profile page.

Making a video call
Once you find a chat partner, you can start video communication in a number of ways.
A. From the Conferendo portal.
You can call the person from the Community page or person's profile page. Click the Call button, which is visible only in the logged regime.
B. From the video messenger address line.
Type or copy-paste the person's nick in the address line above the Conferendo screen. Then click the button
 .
.
C. From the Address Book.
The address book can be seen at the right part of the video messenger. Simply choose the ID from the contact list and double-click it or again use the
 button. You can also call right clicking on the ID and selecting Start Call.

Dropping the call
To abort a video call, click the
 button.

Group video conferences "2x120"
Some theory for the beginning. The mode "2x120" reminds a lecture hall with a tribune or podium. There are 120 persons in a hall and two places on a tribune. All participants simultaneously see these two places. And all can send short text messages to everyone or to the certain participant.
User, who initiates group video conference is called the Host. Conference is adhered to the Host. To join the conference you have to call the Host or answer to his invitation (It looks like a regular incoming call). The Host can activate a mode of auto reception of new participants or the Host must confirm each request in a manual mode.
The Host can invite any participant to get to the podium. And also the Host has a right to disconnect any participant (to "kick" him). Host is always visible to the all of the participants.
The mode "2x120" is available since version 6.2 of Conferendo software. You can download it from our site. This version (or newer) is required for participation.
Now details and screenshots.
To start a group video conference please click the Group conference button.
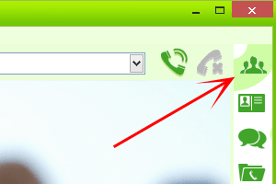
The Group Conference Wizard will be displayed
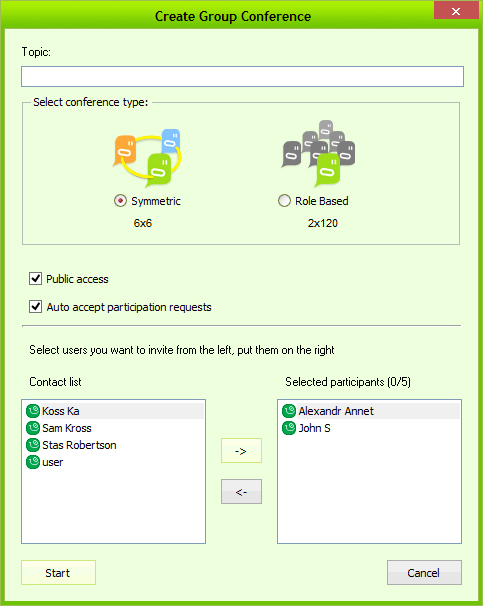
What do you see?
To create a "2x120" group video conference please choose in the wizard:
-
Topic (optional)
-
Type - Broadcast "2x120"
-
Scope – Public
-
Auto accept participation requests – On
-
Choose users for the beginning. Other participants can join conference later by calling you.
-
Hit the Start button
Congratulations! Your group video conference has just begun. And you are the Host of the conference. Other users will see a "star" status opposite your name in the contact list.
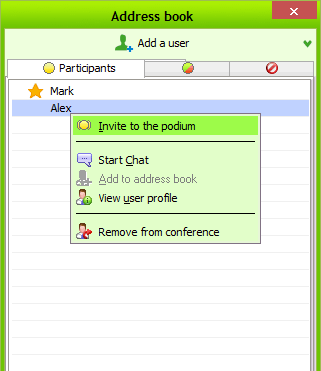
Now as a Host you can invite somebody to podium. In the list of Participants choose "Invite to a Podium" in participant's pull down menu. Menu will appear when you put a mouse pointer over the name of a participant.
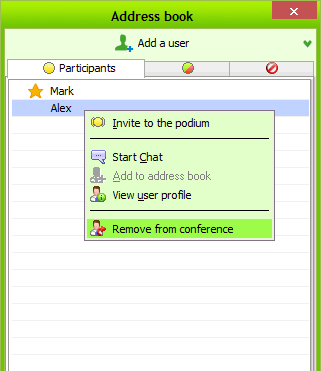
If participant on a podium behaves inappropriately, he can be removed from conference by Kick command in this menu.
To finish a group video conference you need to "stop call" by pressing a red "disconnect" button on the main menu like in ordinary video call. The conference will be over and all participants will be disconnected.
Now let's take a look to a conference from the participant point of view. To become a participant of group video conference you have two ways. First one is to accept incoming call from the Host. Second option is to call to Host. When some one in your contact list is become a host his status is changing from "green ghost" to a "star". When the Host accepts your request you will join the conference.
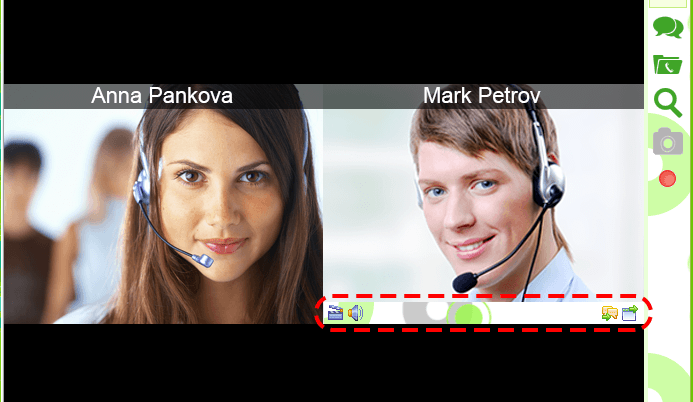
When you see someone on a podium you can do the following:
-
Adjust volume level of the broadcasting or mute it.
-
Temporary stop receiving a video feed
-
Send a message in a chat window to a participant on a podium or in common chat.
-
Detach this video window from the main Conferendo window and, i.e. change the size of it.
To do this operation, point your mouse over the video from a podium.
And you can act in a role of the lecturer. To do this roll over your selfview window. You can notice three buttons. "Take a podium", "Leave podium" and "Push to talk". Push the "Take a podium" button, and your request will be transferred to the Host. If the Host accepts it you will be seen by the auditory. When you finish just press the "Leave Podium" button. You will become the usual participant again.
During the other participant acting from the podium you can state your audio notice. It will be heard by all of the auditory. Do to this push and hold the "Push to talk" button. The sound from your microphone will be broadcasted to conference.
Release the button to finish. One participant at a time can talk this way. When your button "Push to talk" is inactive, that means that someone else (not from a podium) is talking using this function.
Also you can use "Space" button on a keyboard instead of "Push to talk" button.
During this remark you can see a special sign near the participant's name in the list.
To get out from the group video conference push the red disconnect button.
Have nice video conferences!.

Starting text chatting
It is also possible to have a chat talk with other people, using Conferendo. Again, there are several ways to achieve this.
A. Through the Main Menu
Go Actions-> Start Chat and click over the line Send message to… in the newly appeared window. Then choose a contact in the drop-down list.
B. From the Tool bar.
Click the
 button to start the chat and then act as in the previous paragraph.
C. From the Address Book.
Right click on the ID in your Address book and then choose Start Chat.

Address Book
Normally, the Address Book automatically opens after you successfully log in to the server. To open the Address Book manually, click on the corresponding tools button
 or choose View -> Address Book from the Main menu.
The two tabs above the Address Book list provide the following functionality:
-
Online Users – shows just those contacts that are currently online.
-
All Users – shows all contacts in your Address Book.
A double-click on a user's name automatically places a call to that user.
At the top of the Address Book window, you can find the following buttons:
-
 Add new — is used to add new contacts to your Address Book.
-
 Delete — is used to delete the highlighted contact from your Address Book.
Right-click on the user name provides items:
-
Call - enables to make a video call.
-
Start Chat – allows you to send a text message.
-
Rename – is used to change a display name.
-
Delete user – enables to delete the contact.
-
View user profile – allows you to view the user information. In addition you can view the basic profile information for the highlighted contact having pressed button
 at the panel
 Detailed User Information at the lower part of the Address Book.

Call History
To open the Call History window, click on the button
 in the Tool bar.
This feature allows you to see the list of your most recently Missed, Placed and Received calls. To return a call on the Call History list, you can simply double-click on the corresponding entry.
Right-click on an entry provides items:
-
Add to address book — allows you to add a contact from the call list to your Address Book.
-
View user profile – allows you to view the user information. In addition you can view the basic profile information for the highlighted contact having pressed button
 at the panel
 Detailed User Information at the lower part of the Address Book.

Record and playback video
The function provides you with the opportunity of recording:
-
your own video image and speech beyond and within a conference;
-
video image and speech of your conference partner.
At once you can record either your own image or image of your conference counterpart. Beyond a conference you can record only your own video image (self view).
To open the Record and playback video window, click on the corresponding toolbar button
 .
.
On opening the window Record and playback video program will be ready for launch a recording. First of all you have to choose from the dropping list Recording source a name of an user whose image you want to record. List's item corresponding to your own video image is marked with text Self video recording.
 After you have chosen the source of video image, click on the button Begin recording to start the process of recording.
During recording of your video image you will see an icon
 in the top left corner of messenger's video area.
A name of a file being recorded as well as time that has been passing from the beginning of the recording process will be presented in the window Record and playback video.
 You can stop a recording by clicking the button Stop at any time.
You will be allowed to play the recorded video file automatically as soon as the recording process is completed.
In the window Record and playback you will see a name of the recorded file. The first video frame of the recorded file will be presented in the main window of the application. An icon
 will appear in the top left corner of messenger's video area.
 To play a recorded video file press the button Play. An icon
 will appear in the top left corner of messenger's video area in the main window of the application.
Time that has passed from the beginning of playing will be presented in the window Record and playback video.
 To stop a video file playing and come back to its start point press the button Stop.
 To stop a video file playing without changing current video frame press the button Pause. A video frame being played will be presented in the main window of the application. An icon
 will appear in the top left corner of messenger's video area. To renew the playing of the video file press the button Play once more.
 To restore an opportunity to accomplish a new record press the button Release current file.
 You can change a video file being played to another one at any time. Simply press the button Open….
 To assign another name to a video file or save it under another directory press the button Save as….
 You can send a video file by e-mail using your Mail User Agent (for example Outlook) which is set up as a default MUA on your computer. Simply press the button Video mail… - a dialog window will appear presenting video file's name, path and size.
The area Template allows you to set up a desirable typical subject and text of a video letter.
To save settings and create a video letter press the button Create Mail – the letter will be created by means of your e-mail client (MUA).
 To change recording parameters press the button Recording settings – there will appear a dialog window which allows you to set up the following options:
-
Path – allows you to choose a folder which will be used as a store for your video files. You can insert full path using a keyboard or choose the folder having pressed the button Browse….
-
Allow video recording during a conferencing party - the option allows you to set up an answer which will be automatically given to counterpart's applying for permission to record your video image.
-
Associate *.vcr file extension with Conferendo.
-
Always check for this association upon application start - the option turns on verification whether the association *.vcr with Conferendo is set up. Verification will be accomplished at the start of the application.

Microphone and sound troubleshooting
For proper work with application which both using playback and recording devices like microphone on your system you need to configure your system mixer. The following step-by-step guide was originally written for Microsoft Windows 98/Me/2000/XP systems, if you have another operating system you shall take notice of that.

Playback Properties Configuration
1.
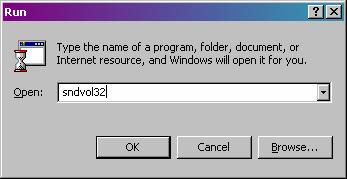
Select menu Start -> Run. In dialog window enter sndvol32 and press Ok. Or navigate to your system Volume Control: Start -> Programs -> Accessories -> Entertainment -> Volume Control
You should see next dialog window Volume Control
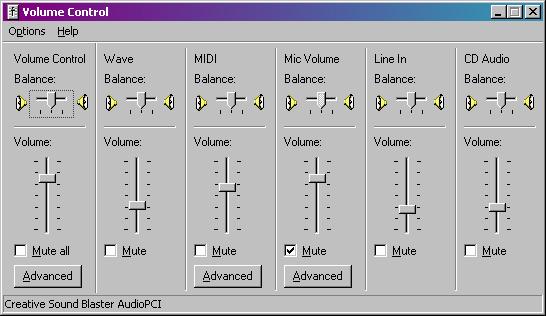
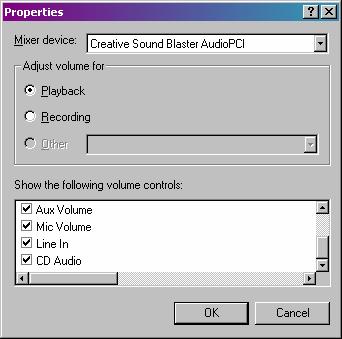
If microphone panel Mic Volume (or Microphone) isn't there you need to enable it, select from menu Options -> Adjust volume for -> Playback and check the box opposite to Mic Volume (or Microphone) line in the Show the following volume controls: list. Click on Ok button.
Microphone has separate properties for playback and recording channels. You need to disable sound playback from microphone otherwise you'll hear yourself in your speakers or headphones while talking. This also cause parasitic hiss and echo. To disable microphone playback set Mute checkbox in Mic Volume (or Microphone) panel in Volume Control window as it showed on screenshot below.

Be sure you didn't set Mute All in Volume Control panel or Mute in Wave panel.
Recording Properties Configuration
Please repeat the first step from Playback Properties Configuration section.
You need to switch to Recording Control window. Select from menu Options -> Adjust volume for -> Recording and check the box opposite to Mic Volume (or Microphone) line in the Show the following volume controls: list. Click on Ok button.
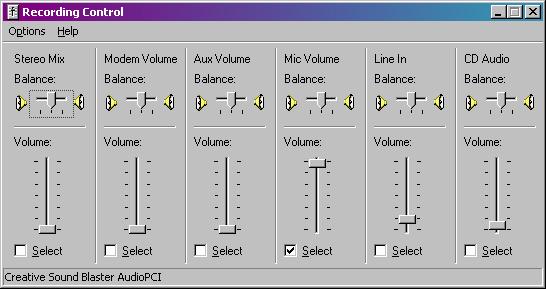
Make sure you have checkbox Select selected in Mic Volume (or Microphone) panel in Recording Control window.
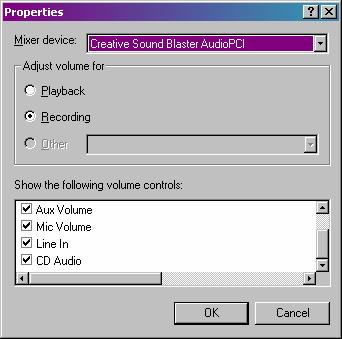
Microphone Sensitivity Boost
Most of sound cards have special feature named Microphone Boost. It allows to increase microphone sensitivity this especially useful for passive microphones which mostly used in headsets. So if you have microphone sensitivity troubles follow the steps below.
Please repeat the steps described in Playback Properties Configuration section.
Click on Advanced button in Mic Volume (or Microphone) panel.
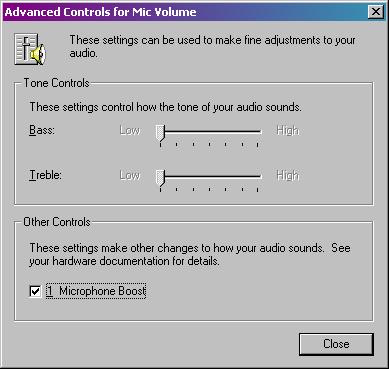
If you see Microphone Boost checkbox there please select it.
Some systems have special sound drivers and therefore may have Mic Boost property under different name.
